From Start to Finish: Wood Fence Installation Process

Wood fences not only enhance the aesthetics of your property but also provide privacy and security. If you’re considering installing a wood fence, understanding the process from start to finish can make the endeavor smoother and more successful. In this comprehensive guide, we’ll take you through each step, ensuring that you’re well-equipped to embark on your wood fence installation journey. Whether you’re in the heart of Old Town, NC, or anywhere else, this guide will help you navigate the process with confidence.

Understanding Your Needs

Assessing Your Property’s Requirements

Before diving into the wood fence installation process, it’s crucial to assess your property’s unique requirements. Consider the purpose of the fence—is it for privacy, security, aesthetics, or a combination of these? Evaluate the terrain, taking note of any slopes, uneven ground, or obstacles that might impact the installation process. By understanding your property’s specific characteristics, you can plan accordingly and choose the most suitable design and installation approach.

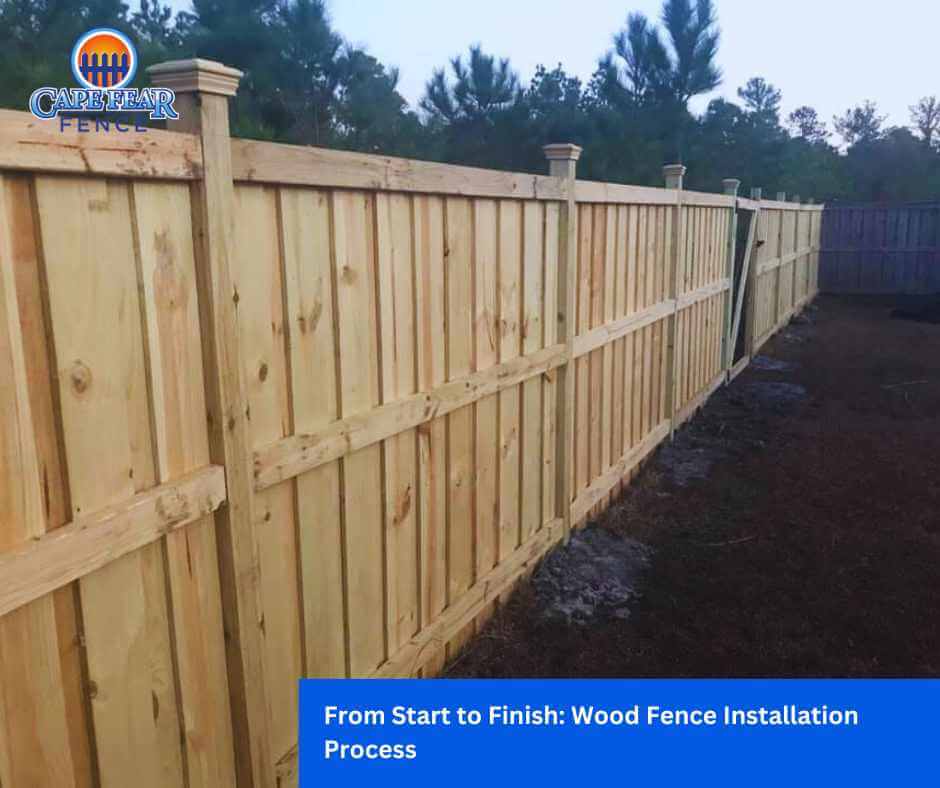
Choosing the Ideal Wood Fence Design

Selecting the right wood fence design is a significant decision that affects both the functionality and the visual appeal of your property. Are you leaning towards a classic picket fence, a robust privacy fence, or a decorative lattice design? Each design serves different purposes and has its own unique charm. Consider factors such as the architectural style of your home, local regulations, and personal preferences. The design you choose will set the tone for your property’s overall aesthetic, so take the time to explore options that resonate with your vision.

Gathering Materials and Tools

Selecting the Right Type of Wood

The type of wood you choose for your fence can significantly impact its durability, appearance, and maintenance requirements. Different wood species offer varying levels of resistance to weather, insects, and decay. Here are a few popular options to consider:
  • Cedar: Known for its natural resistance to decay and insects, cedar is a popular choice for its pleasant aroma and warm color variations.
  • Redwood: With its rich tones and resistance to decay, redwood is a premium option that adds elegance to any property.
  • Pressure-Treated Pine: Treated for durability, pressure-treated pine is a cost-effective choice that withstands the elements effectively.

Essential Tools for the Job

Having the right tools on hand is essential for a successful wood fence installation. Here’s a list of tools you’ll likely need:
  • Post Hole Digger: For digging holes to set the fence posts securely.
  • Level and Plumb Line: Ensures the fence is straight and level.
  • Circular Saw: Cuts the wooden panels and rails to the desired lengths.
  • Hammer and Nails: Used for attaching panels and rails.
  • Screws or Nails: Essential for securing fence components together.
  • Measuring Tape: Ensures accurate measurements for precise installation.
  • Concrete Mix: For stabilizing fence posts in the ground.
  • Safety Gear: Includes gloves, safety glasses, and ear protection for safe installation.

Preparing the Ground

Clearing the Area and Marking Boundaries

Before you begin the installation process, it’s important to clear the area where your wood fence will be placed. Remove any debris, vegetation, or obstacles that could hinder the installation. This step ensures a clean slate and provides a clear view of the property’s boundaries. Once the area is cleared, mark the boundaries using stakes and string. This helps you visualize the fence’s layout and ensures accurate placement during the installation.

Ensuring Proper Measurements and Leveling

Step
Description
Measure Property Perimeter
Accurately measure the length of your property’s perimeter using a measuring tape.
Determine Post Spacing
Decide how far apart you want your fence posts to be. Typically, posts are spaced 6 to 8 feet apart.
Mark Post Locations
Mark the ground where each fence post will be placed, using spray paint or stakes.
Level the Ground
Use a level to ensure the ground is even and the posts will be properly aligned.
Check for Slopes
If your property has slopes, measure the slope’s angle to adjust post placement accordingly.
Proper measurements and leveling are crucial for a well-constructed fence. By following these steps, you’ll ensure that your fence is not only aesthetically pleasing but also structurally sound.
From Start to Finish: Wood Fence Installation Process

Fence Construction

Setting the Posts: Proper Depth and Alignment

Setting the fence posts correctly is a critical step to ensure the stability and longevity of your wood fence. Here’s how to do it right:
  • Digging Holes: Use a post-hole digger to create holes for the fence posts. The depth of the holes should be at least one-third the height of the posts plus 6 inches for gravel.
  • Adding Gravel: Place a layer of gravel at the bottom of each hole to promote drainage and prevent wood rot.
  • Inserting Posts: Insert the posts into the holes and use a level to ensure they’re perfectly vertical. Temporary bracing may be needed to hold the posts in place during installation.
  • Filling with Concrete: Fill the holes with concrete mix and water according to the manufacturer’s instructions. Ensure the posts remain level while the concrete sets.

Attaching Rails and Panels: Tips for Stability

Once the posts are set and the concrete has cured, it’s time to attach the rails and panels to complete the fence structure. Here are some tips for a sturdy and secure fence:
  • Measuring and Cutting Rails: Measure the distance between the posts and cut the rails to fit. Ensure the rails are level and evenly spaced.
  • Attaching Rails: Secure the rails to the posts using screws or nails. Use a level to ensure the rails are horizontal.
  • Installing Panels: Slide the panels between the rails and attach them using nails or screws. Make sure the panels are level and properly aligned.
  • Checking for Stability: Give the fence a gentle shake to test its stability. Make any necessary adjustments to ensure a solid and secure installation.
With the fence structure in place, you’re ready to move on to the finishing touches that will enhance both the appearance and functionality of your wood fence.
 

Finishing Touches

Applying Finishes for Protection and Aesthetics

After constructing the main structure of your wood fence, it’s important to apply finishes that protect the wood from weathering and enhance its appearance. Depending on your preference, you can choose from various finishes such as paint, stain, or sealant. These finishes not only add a layer of protection against moisture and UV rays but also allow you to customize the color and style of your fence. Properly finished wood will maintain its beauty and durability for years to come.
Gate Installation: Balancing Functionality and Security
If your wood fence includes a gate, its installation requires careful consideration of both functionality and security. Here are a few key points to keep in mind:
  • Gate Design: Choose a gate design that complements the overall style of your fence. Whether it’s a simple single gate or a double gate with decorative elements, ensure it aligns with your vision.
  • Hardware Selection: Opt for durable and secure hardware, including hinges, latches, and locks. The hardware should withstand regular use while providing adequate security.
  • Proper Alignment: Install the gate in a way that ensures smooth and easy operation. It should open and close without dragging or sticking.
  • Latch Placement: Position the gate latch at a comfortable height for easy access. Consider adding a lock for added security.
By paying attention to these finishing touches, you’ll create a wood fence that not only looks stunning but also functions effectively and stands the test of time.

Conclusion

As you embark on your wood fence installation journey, remember that attention to detail and careful planning are essential for a successful outcome. From assessing your property’s needs to selecting the right materials and following proper installation techniques, each step plays a vital role in creating a fence that’s both functional and visually appealing.
 
At Cape Fear Fence and Fabrication LLC, we take pride in turning your fencing vision into reality. Our expertise and dedication ensure that your wood fence installation in Old Town, NC, meets the highest standards of quality and craftsmanship. With years of experience in the industry, we’re committed to enhancing your property’s beauty, privacy, and security through our exceptional fencing solutions.
 
If you’re ready to transform your property with a beautiful wood fence, contact us today. Let’s collaborate to bring your ideas to life and create a fence that reflects your style and enhances your outdoor space. Your vision is our priority, and we’re here to exceed your expectations every step of the way.